PBR Explorer
What is PBR Explorer
PBR Explorer is an interactive web platform that shares and promotes process-based restoration (PBR) projects. Users can easily upload detailed project information, acknowledge collaborating partners, and publicly showcase their work to clientele, stakeholders, and broader restoration community. The Explorer supports a diverse range of restoration actions including riparian plantings, structural as-builts, beaver translocations, and more, while providing statistical summaries of completed work.
For a live demonstration of how to use the website, be sure to watch the video at the bottom of this page.
How to Use the Menu Bar
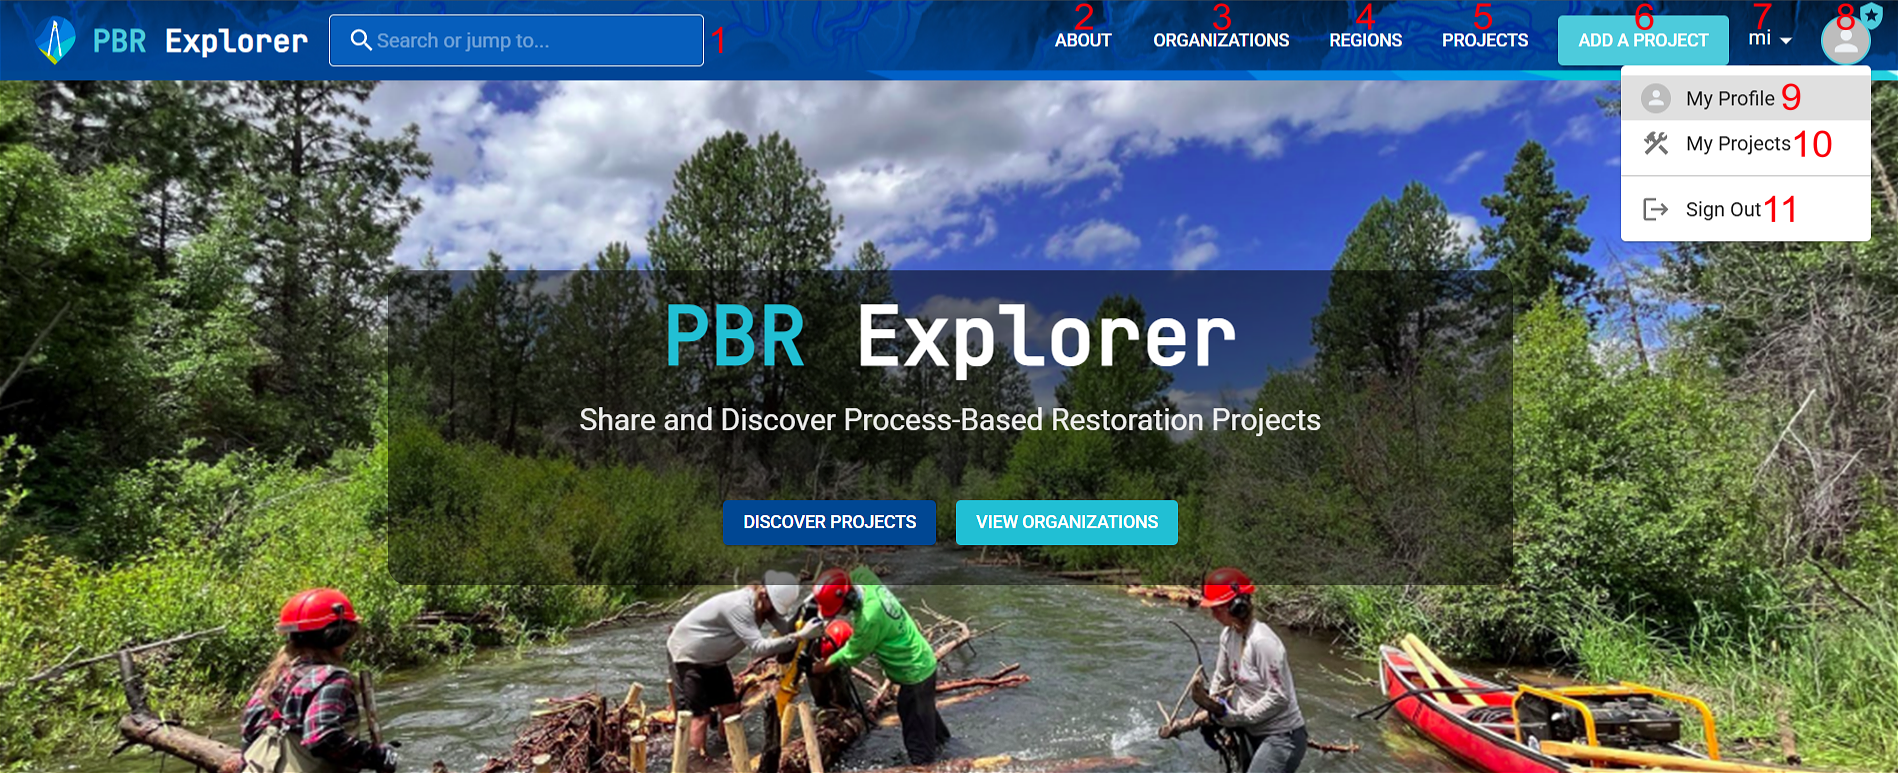
The Menu Bar is the primary tool for navigating the Explorer.
-
Search Bar (1): Find restoration projects or organizations by name. Start typing (minimum three characters) to filter results.
-
About (2): Learn more about process-based restoration, the Riverscapes Consortium, or to get assistance.
-
Organizations (3): Discover organizations driving process-based restoration. Click on any organization card to see their mission, restoration work, or as-built statistics (project total, structure count, and aggregated length).
-
Regions (4): Get a geographic overview of completed projects, sorted by continent, country, and state/province. Click on any region to access its as-built statistics and specific project details.
-
Projects (5): Use an interactive map to explore restoration projects worldwide. Zoom in with your scroll wheel or click cluster blocks to pinpoint specific projects.
-
Add a Project (6): To submit a new restoration project, but only visible when signed in with Riverscapes Consortium account.
-
Unit Bar (7): Toggle unit display between imperial (miles) and metric (kilometers).
-
User Profile (8): To view all organizations (9) and restoration projects (10) linked with your Rivercapes Consortium account. Also where to sign out (11).
Adding a New Project
Once signed into your Riverscapes Consortium account, you can add a new project in the Explorer. If you don’t have an account, create one (e.g. using a username and password, or sign in with your Google or Apple account).
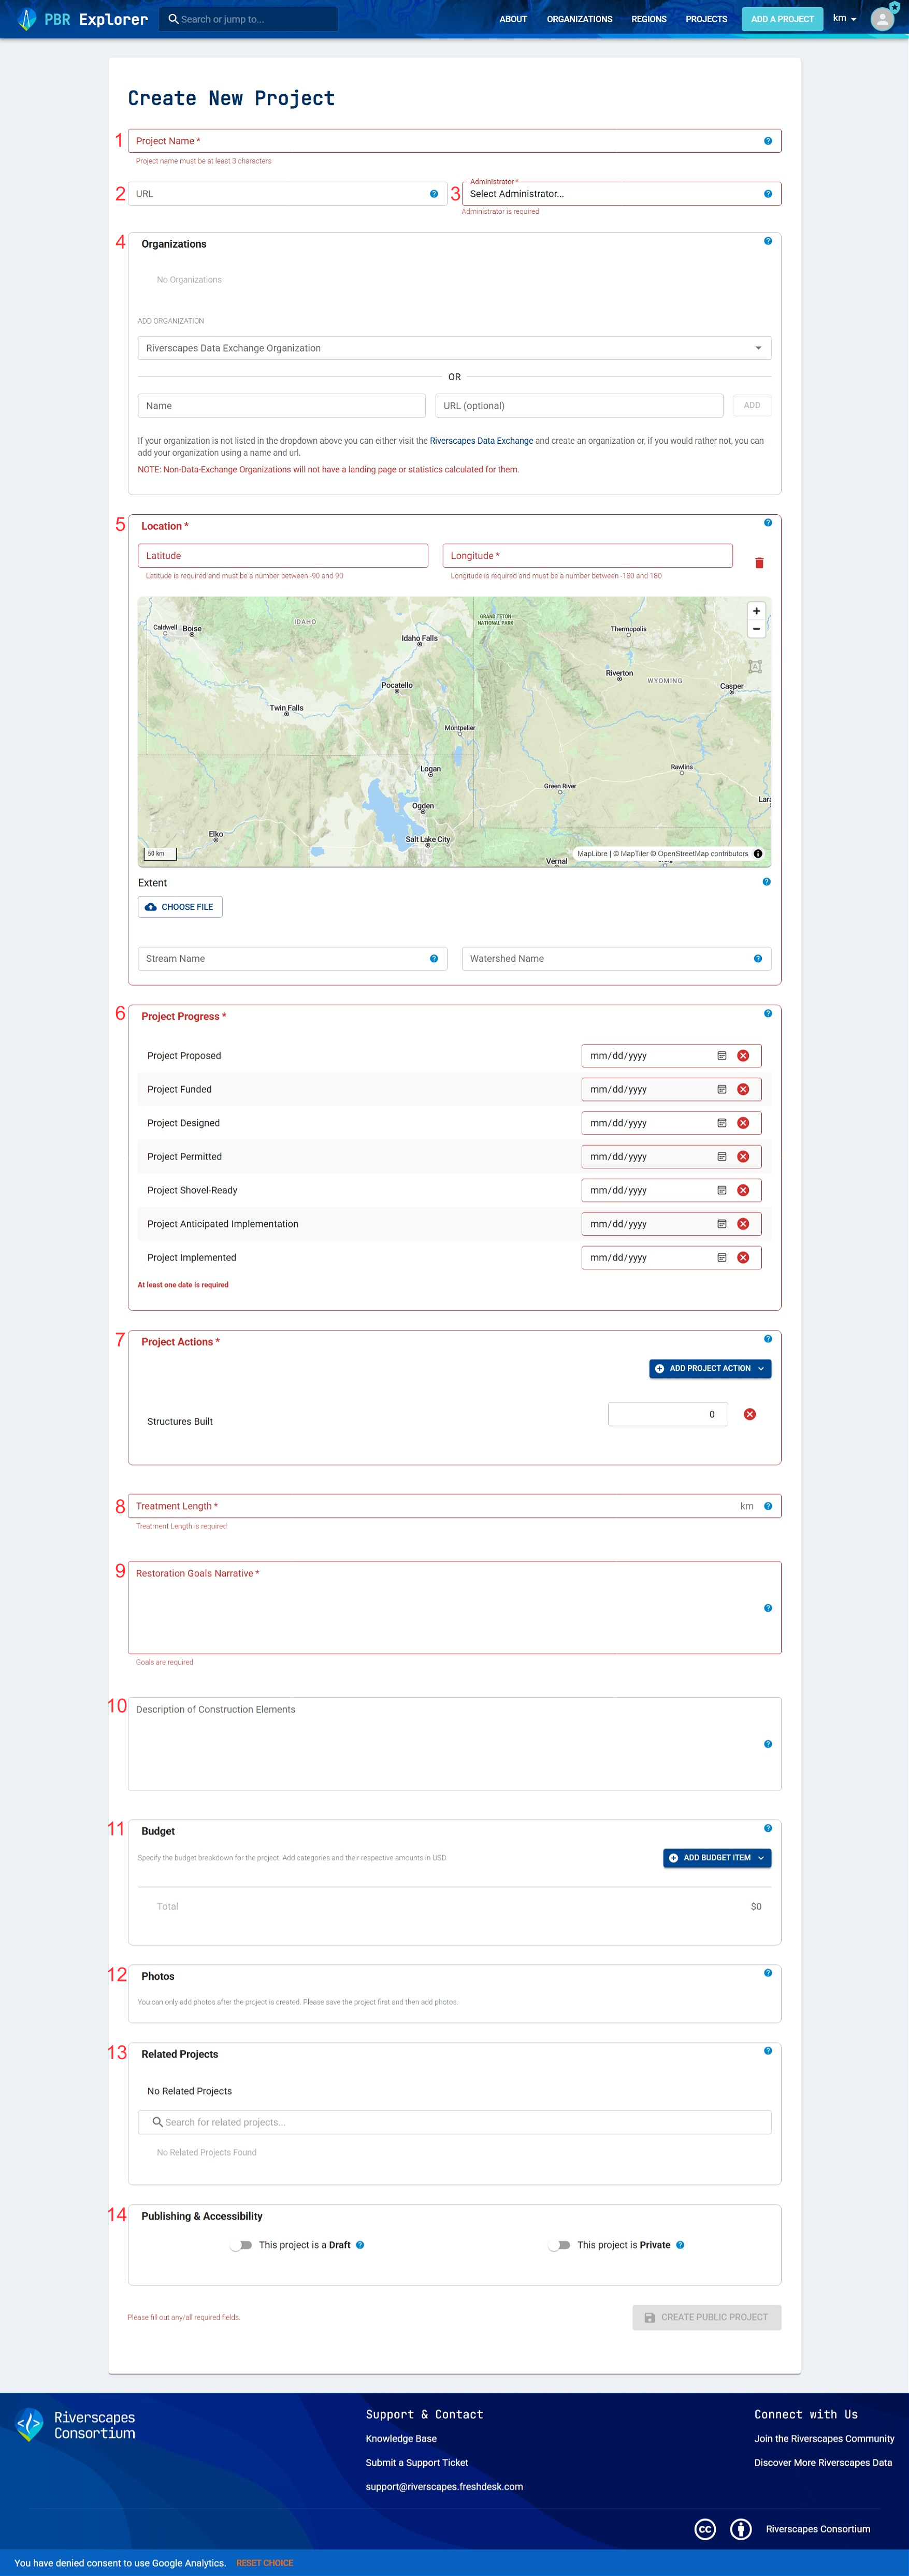
Project Page Overview
-
Project Name (1): Distinct project title. Must include at least three characters to complete. Required.
-
URL (2): Optional. Provides links to supplementary resources and supporting material such as design reports, as-built maps, websites, YouTube videos and more.
- Website Requirement: URLs must begin with
https://and include domain suffix (.com,.gov, etc.).
- Website Requirement: URLs must begin with
-
Administrator (3): Organization (from Data Exchange) or individual with permissions to edit project information. You can only enter your individual profile or Data Exchange organizations you're affiliated with. Required.
-
Individual Ownership: If an individual owns the project, only they can make changes to the project.
-
Organization Ownership: If an organization owns the project, only members with administrative privileges (for that organization) can make changes to the project.
Note: However, the administrator of a PBR project doesn’t mean they were involved with the project itself.
-
-
Organizations (4): Identify all organizations involved in your project. Optional.
-
How to Add: Select an organization from the Data Exchange dropdown menu or manually enter the organization's name and URL if not listed. Multiple organizations are allowed to be entered.
-
Roles: For each organization, assign a specific role based on their involvement. You can assign multiple roles to multiple organizations. For example, one organization could be the Project Manager, Field Implementation Crew, and Project Designer. Another might be the Project Owner and Funder, while a third serves solely as a Project Manager.
-
-
Location (5): Required. You can enter the project’s location by:
-
Typing the latitude and longitude into the associated text boxes.
-
Clicking on a location from the interactive map.
-
Uploading a GeoJSON polygon with the project extent.
To provide more contextual information, you can also:
-
Specify the channel or tributary where restoration occurred under Stream Name.
-
Enter the encompassing watershed or its HUC code under Watershed Name.
-
-
Project Progress (6): Required. Timeline of your project’s important milestones, providing viewers with a general understanding of its progression.
Each milestone must be entered with a complete month, day, and year (in that order), which can be exact dates or close approximations. Dates don't need to appear in chronological order as shown in the Explorer (e.g., your permitting date might precede your funding date), but at least one milestone date must be entered.
-
Project Actions (7): Different restoration activities that occurred in your project. Multiple entries are allowed but at least one must be entered. Required.
-
Treatment Length (8): Total length of treatment in miles or kilometers. Values have to be greater than zero for submission. Required.
-
Restoration Goals Narrative (9): Brief description of the specific goals and/or objectives associated with your project. This should ideally be kept between 1-2 paragraphs. Required.
-
Description of Construction Elements (10): Brief description of restoration activities (design, as-built construction, etc.) undertaken in your project. For example, if low-tech structures (e.g., BDAs, PALS) were built, describe the types of structures, materials used, construction methods, etc. This should ideally be kept between 1-2 paragraphs. Optional.
-
Budget (11): Detailed breakdown of your project’s costs and expenditures. You can enter estimates for typical project expenses such as planning, labor, maintenance, etc. organized by pre-project, implementation, and post-project phases. Optional.
-
Photos (12): Project photos (limited to 20) can be uploaded after your project is created and submitted to the Explorer. Each photo must be 100 MB or smaller. If you upload multiple photos, you can select one to be the cover photo, which will be featured on the project card. Optional.
-
Related Projects (13): Link existing projects to your own (limited to 10) to highlight shared funding, different treatment phases, or geographical proximity. Type into the search bar to start filtering results. Optional.
-
Publishing and Accessibility (14): Can list your project as a draft or make it private. Refer to the following table for more details. Optional.
| Draft Project | Private Project | |
|---|---|---|
| Use | Ideal for incomplete or partially complete projects (i.e., no implementation) | Preclude public access to project (e.g., private property) |
| Visibility | Found on profile page of administrator | Found on profile page of administrator and affiliated organizations |
| Included in As-Built Statistics | No | Yes |
Video Demonstration
FAQ
Q: Why should I enter my project to the PBR Explorer? You should enter your project into the Explorer to showcase it to the Riverscapes community, monitor as-built progression (i.e., as-built statistics) over time, and acknowledge involved organizations for their contribution.
Q: When should I create a new project? You can enter your project into the Explorer either upon completion (after its implementation), or during pre-implementation if you want to track it early. If entered before implementation, you can designate your project as a draft via "Publishing & Accessibility" to exclude it from as-built statistics. Ultimately, the decision is up to you.
Q: How should I enter a project with multiple treatments? For each project phase, you should create a new entry in the Explorer. This ensures that each phase is distinct from the initial as-built. You can link project phases using the "Related Projects" feature to track treatment progression.
Q: My project occurred on private property and the landowner doesn’t want to disclose its location to the public. Can I still enter it into the Explorer? Yes you can. Under Publishing & Accessibility, you can make a project private. This means that the project will only be visible to the administrator and involved organizations.
Q: How can I display my organization under the Organizations tab?
A: An organization has to be created in the Data Exchange and be associated with at least one project (owner or affiliate) to display in the Organizations tab.